从 React 到 Vue
前言
本篇文章将记录 React 语法与 Vue 语法互相转换的要点.
生命周期
Vue 中的组件也有与 React 组件类似的生命周期方法。例如, 当组件状态就绪, 而组件还没有挂载到页面之前, 将触发 created 这个 hook。
这里两者的一大区别是:React 中的 shouldComponentUpdate 在 Vue 里没有等效存在。由于 Vue 是有反应系统的, 所以这里不需要它。
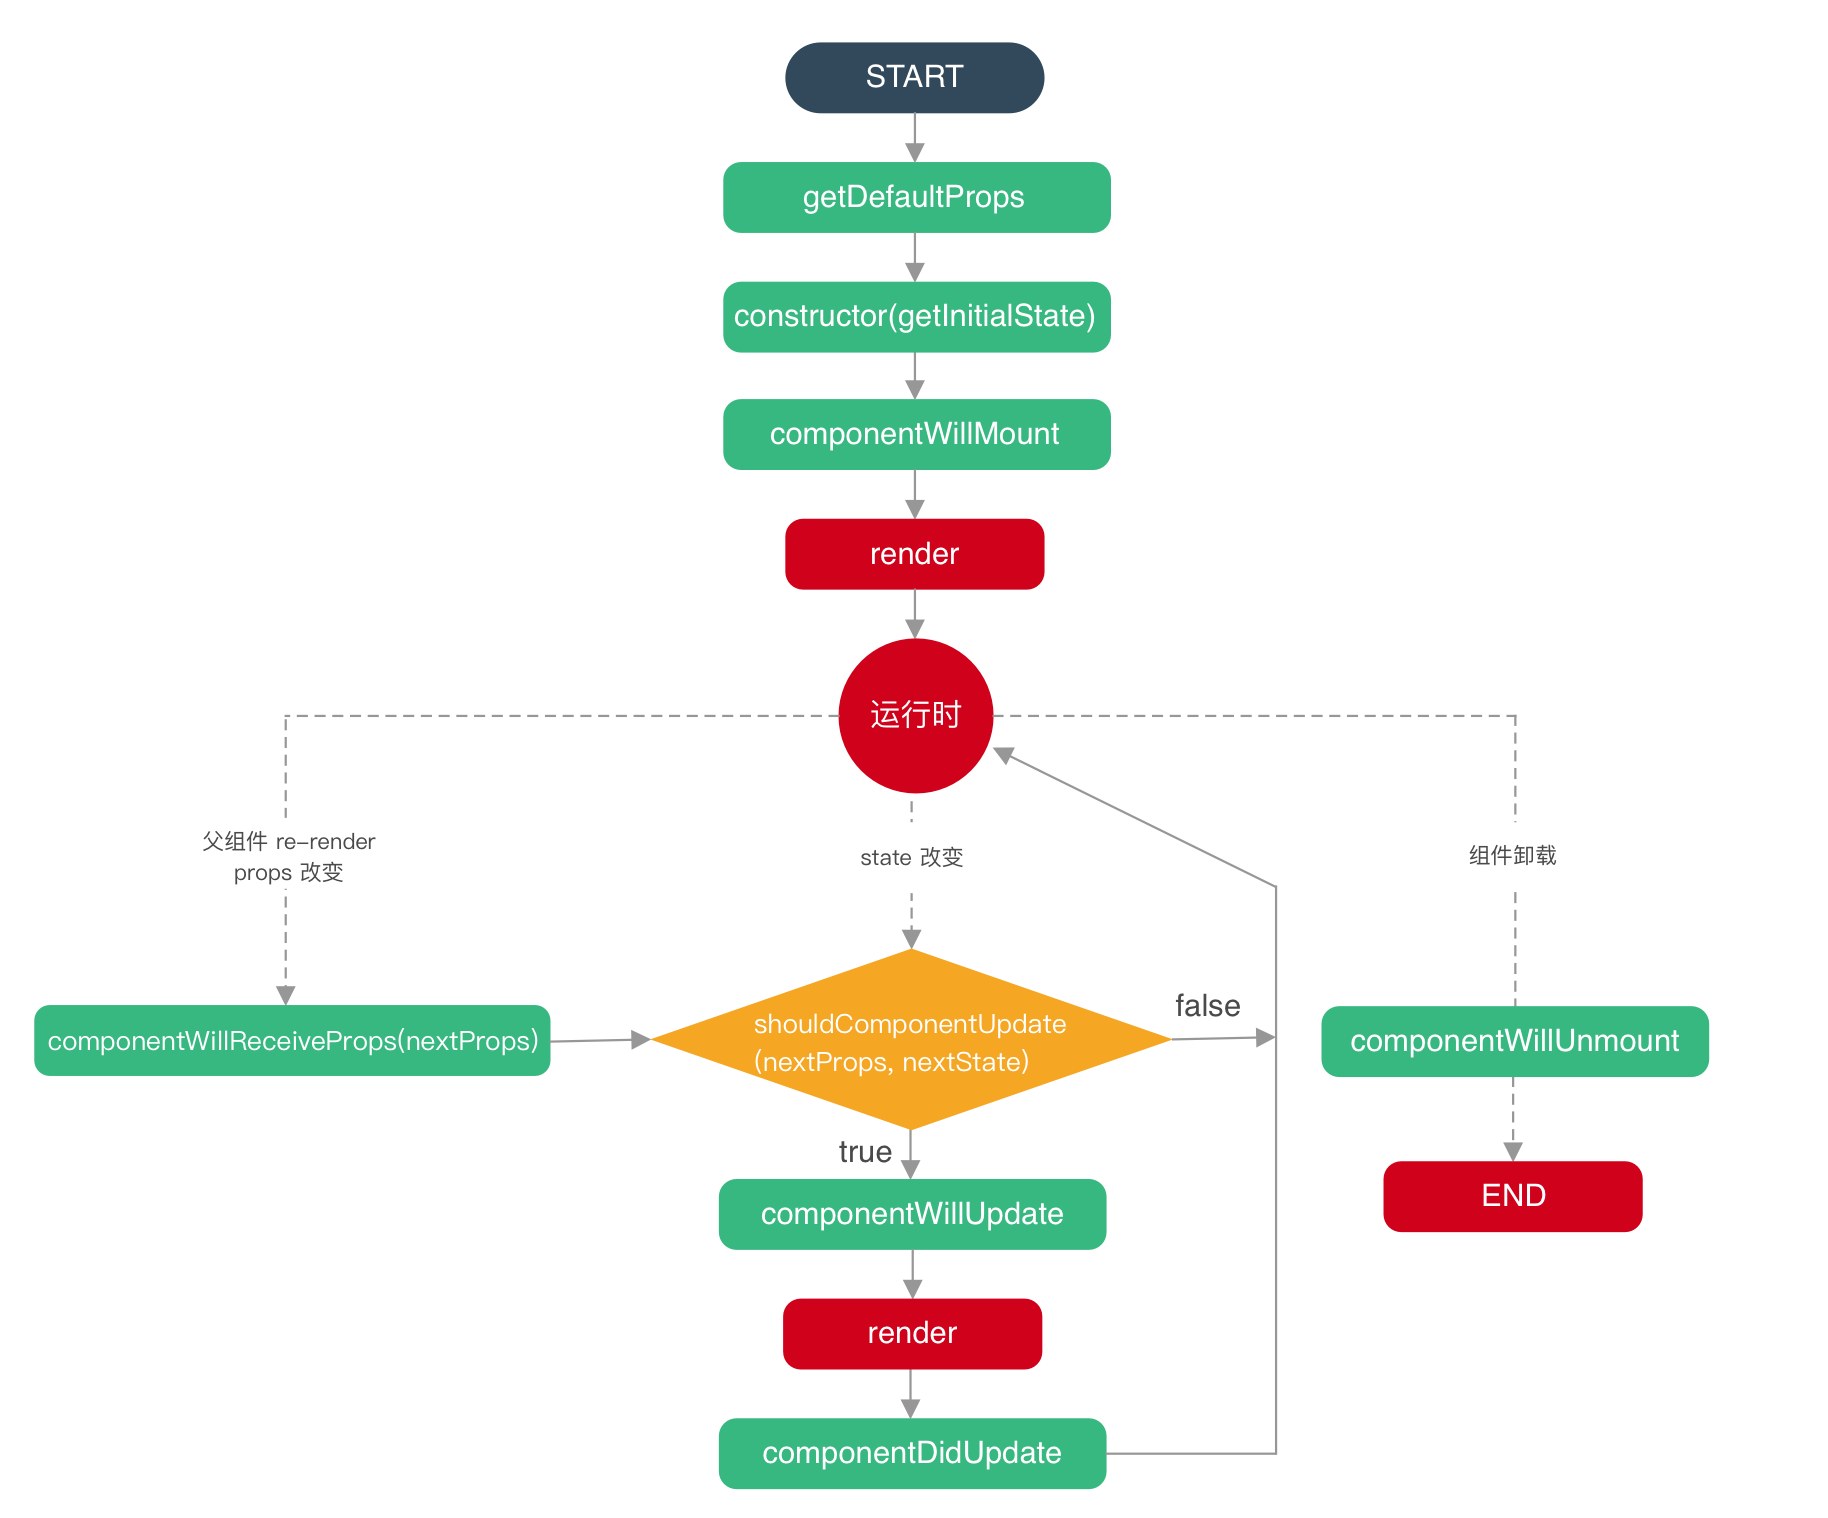
React 的生命周期与 vue 的生命周期有着很大的不同, 下面列出的是 React 和 Vue 的生命周期对比
React 生命周期

挂载期(Mounting)
constructor() => componentWillMount() => render() => componentDidMount()
存在更新期(Updating)
当更新执行直接执行以下:
componentWillReceiveProps(nextProps) => shouldComponentUpdate(nextProps,nextState) => componentWillUpdate (nextProps,nextState) => render() => componentDidUpdate(prevProps,prevState)
销毁时(Unmounting)
关闭页面组件最终都会销毁: componentWillUnmount()
强调几点:
constructor() 中完成了 React 数据的初始化, 它接受两个参数:props 和 context, 当想在函数内部使用这两个参数时, 需使用 super()传入这两个参数。注:只要使用了 constructor()就必须写 super(),否则会导致 this 指向错误。
render()中会插入 jsx 生成的 dom 结构, react 会生成一份虚拟 dom 树, 在每一次组件更新时, 在此 react 会通过其 diff 算法比较更新前后的新旧 DOM 树, 比较以后, 找到最小的有差异的 DOM 节点, 并重新渲染。
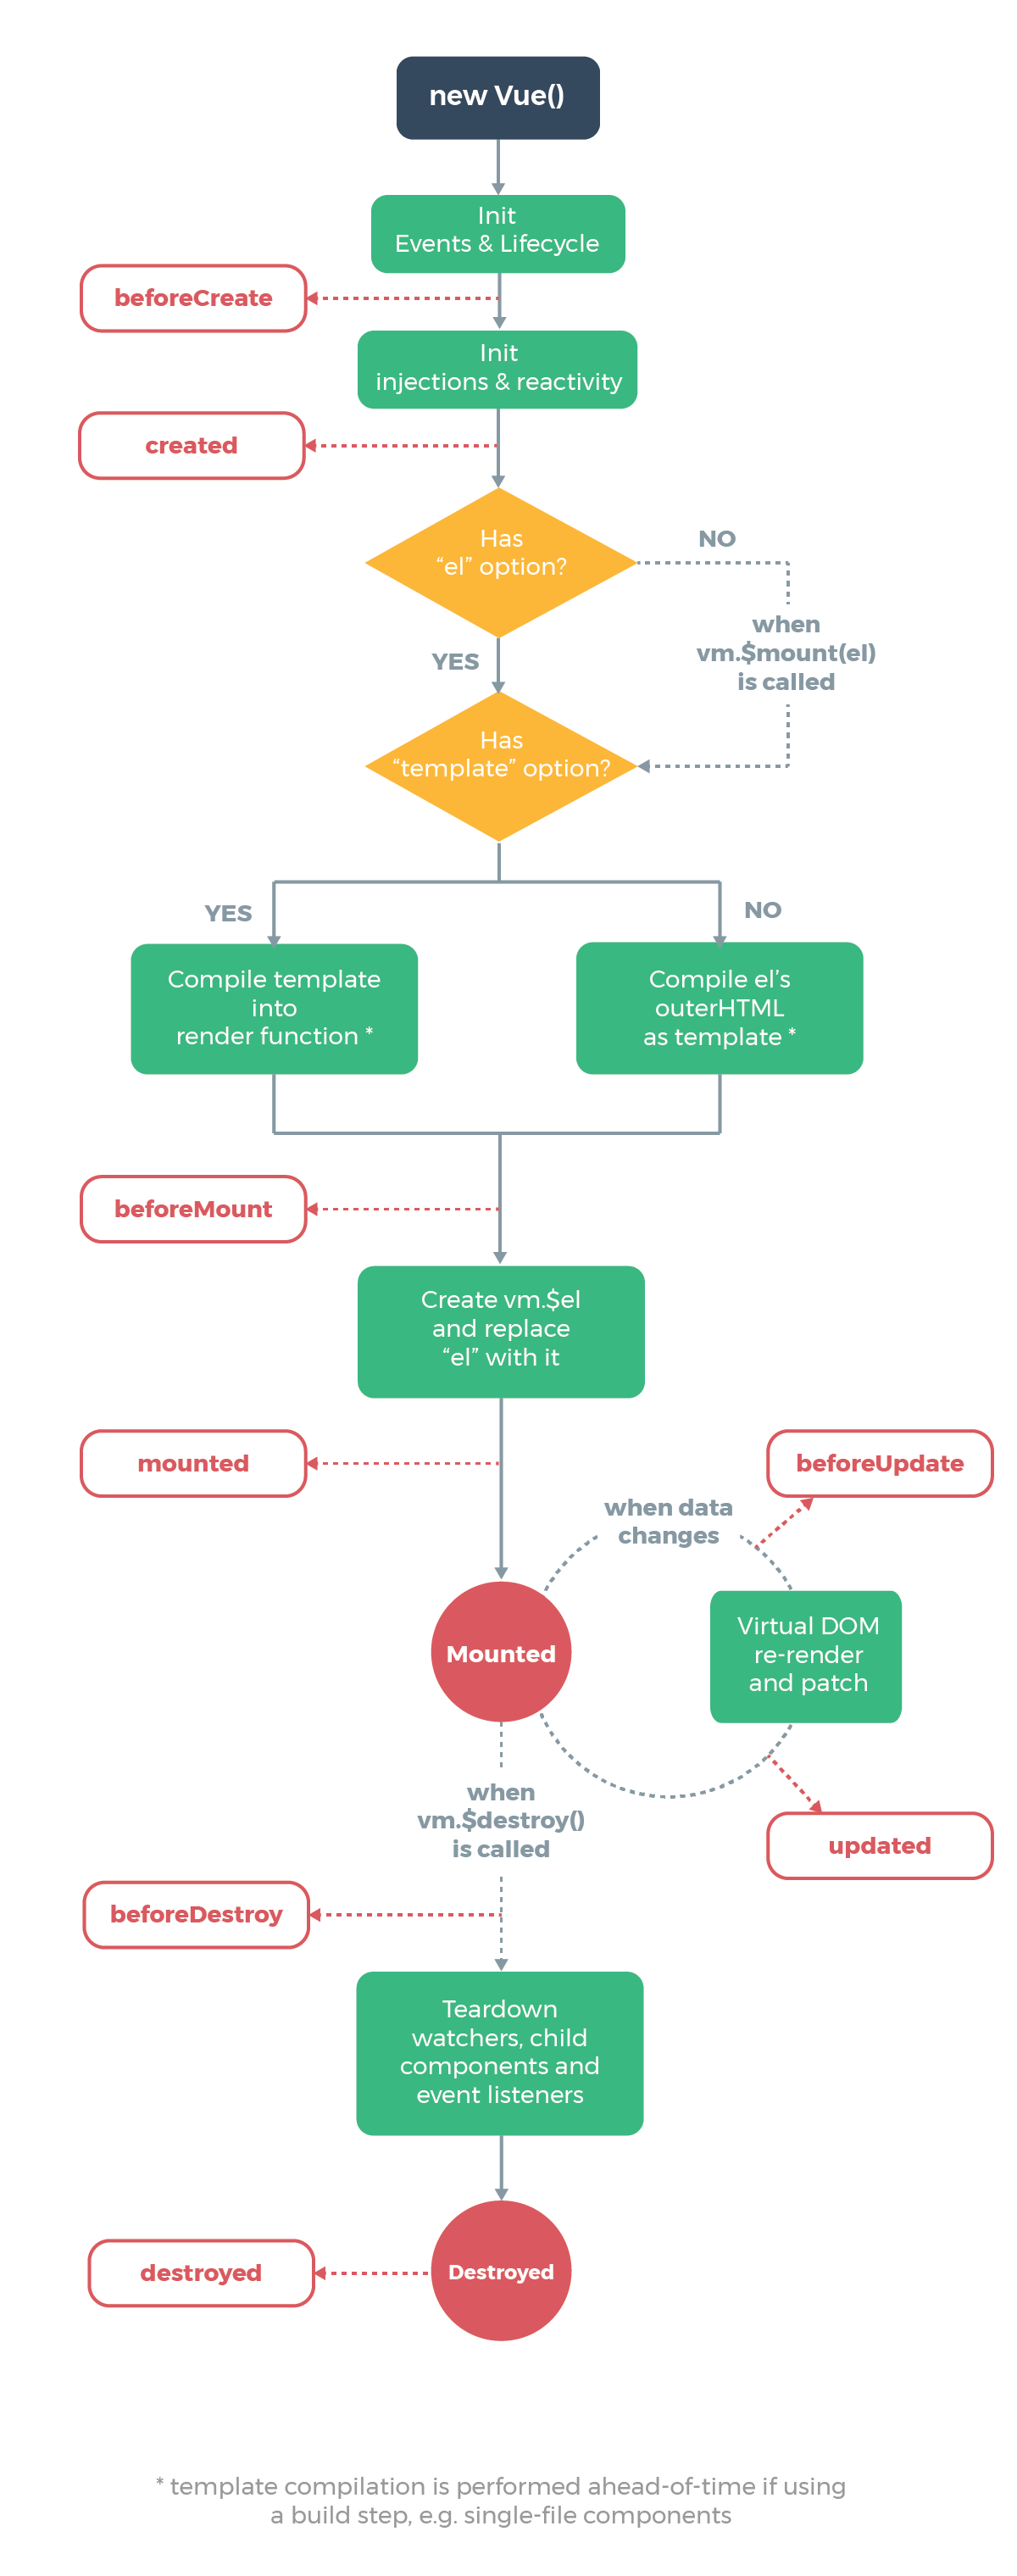
Vue 生命周期

vue 生命周期在项目中的执行顺序
beforeCeate() => data() => created() => beforeMount() => mounted()
当更新会再 created 之后插入: beforeUpdate => updated
关闭页面组件最终都会销毁: beforeDestroy() => destroyed()
强调几点:
- beforeCeate 在事件和生命周期钩子初始化前调用
- data 的初始化是在 created 前完成数据观测(data observer)
vue 中内置方法属性的运行顺序
props => methods => data => computed => watch
React 与 Vue 语法差异对比
以下内容参考来源 从 react 转职到 vue 开发的项目准备
props 对比
- Vue 的 prop 必须在 props 字段里声明。React 的 prop 不强制声明, 声明时也可以使用 prop-types 对其声明约束。
- Vue 的 prop 声明过后挂在在组件的 this 下, 需要的时候在 this 中获取。React 的 prop 存在组件的 props 字段中, 使用的时候直接在 this.props 中获取。
组件状态对比
- Vue 的状态 data 需要在组件的 data 字段中以函数的方式声明并返回一个对象。React 的状态 state 可以直接挂载在组件的 state 字段下, 在使用之前初始化即可。
- Vue 的状态 data 声明后挂在在 this 下面, 需要的是时候在 this 中获取。React 的状态 state 存在组件的 state 字段中, 使用的时候直接在 this.state 中获取。
- Vue 的状态更新可以直接对其进行赋值, 视图可以直接得到同步。React 的状态更新必须使用 setState, 否则视图不会更新。
组件方法对比
- Vue 的方法需要在 methods 字段下声明。React 的方法用方法的方式声明在组件下即可。
- Vue 与 React 使用方法的方式相同, 因为都是挂载在组件中, 直接在 this 中获取即可。
计算属性对比
- Vue 有计算属性在 computed 字段中声明。React 中无计算属性特性, 需要其他库如 mobx 辅助完成。
- Vue 的计算属性声明后挂载在 this 下, 需要的时候在 this 中获取。
监听数据对比
- Vue 中可以在 watch 字段中对 prop、data、computed 进行对比, 然后做相应的操作。在 React 所有变化需要在声明周期 componentWillReveiveProps 中手动将 state 和 prop 进行对比。
JSX 语法改造成 Vue 语法的注意事项
- 注释可以进行忽略, jsx 注释一般为
{
  /* ....... */
}
- React 和 Vue 中的 props 有着大部分的相同, 但是也需要进行转化
| 框架 | 说明 |
|---|---|
| React | 通过 propTypes 来定义属性名和属性类型,defaultProps 用来设置默认值 |
| Vue | 通过添加 props 属性 |
- 组件的自有状态
| 框架 | 说明 |
|---|---|
| React | 在初始化的时候, 通过 this.state = {xxx}来设置 |
| Vue | 通过 data 返回函数来设置值, 不同于 react 的 state, vue 是响应式 |
- 处理事件
| 框架 | 说明 |
|---|---|
| React | 相应的事件都加到了组件的实例方法上 |
| Vue | 设计上比较好, 处理事件都加在一个 methods 对象下面, 方便查找,更直观 |
// react
class FrontendMagazine {
  clickme() {
    // xxxx
  }
}
// vue
{
    name: 'frontend-magazine',
    methods: {
        clickme () {
            // xxx
        }
    }
}
- 组件的错误捕获
| 框架 | 说明 |
|---|---|
| React | componentDidCatch |
| Vue | errorCaptured |
- 在标签上写的 onxxx, 一般对应的 vue 改造为
- JSX 写法
<comp onClick={() => {}}></comp>
- Vue 写法
<com @click=""></com>
- 组件绑定的参数, 需要在 vue 中转成 v-bind
- JSX 写法
<comp style={{ xxx: xxxx }}></comp>
- Vue 写法
<comp :style="{ xxx: xxx }"></comp>
- 组件上的属性名 className 直接替换成 class
- JSX 写法
<comp className="xxxx"></comp>
- Vue 写法
<comp class="xxxx"></comp>
- 在较高版本的 React 里有 flagments 的支持, 允许根节点返回多个节点, 目前没有看到 vue 支持的, 在 vue 中我们直接使用一个块级元素包裹
- JSX 写法
{/* 第一种写法 */}
<flagment>
  <comp1></comp1>
  <comp2></comp2>
</flagment>

{/* 第二种写法 */}
const App = () => (
  <>
    <span>I'm</span>
    <span>Fragment</span>
  </>
)
- Vue 写法
<!--第一种写法-->
<div class="xxxx">
   <comp1></comp1>
  <comp2></comp2>
</div>

<!--第二种写法-->
<div class="xxxx">
  <span>I'm</span>
   <span>Fragment</span>
</div>
- JSX 渲染页面或者组件都是通过 render 方法进行渲染的, 在 vue 中 既可以保留 render 方法, 也可以将其 render 方法进行改造成 template
- JSX 写法
import * as React from "react";
export default class ApplyOrSave extends React.Component {
  render() {
    return <div></div>;
  }
}
- Vue 写法
<div class="xxxx">
  <comp1></comp1>
  <comp2></comp2>
</div>
- 组件替换, 在 React 语法中, 组件在模板中的写法基本是 xxx.xxx, 在 vue 中识别不到, 需要我们转成中横线的写法
- JSX 写法
<Comp.Panel></Comp.Panel>
- Vue 写法
<comp-panel></comp-panel>
- JSX 语法中允许使用 styled-components 生成一个组件(该工具即在 js 中写 css,css in js), 在 vue 中也同样支持, 但是需要将该依赖替换成 vue-styled-components
- JSX 写法
import styled from "styled-components";

const AppSetupContainer = styled.div`
  display: flex;
  flex-direction: column;
  width: 100%;
  justify-content: center;
  align-items: center;
`;
function AppSetup() {
  return (
    <AppSetupContext.Provider>
      <AppSetupContainer></AppSetupContainer>
    </AppSetupContext.Provider>
  );
}

export default AppSetup;
- Vue 写法
import styled from 'vue-styled-components' const AppSetupContainer = styled.div`
display: flex; flex-direction: column; width:100%; justify-content:center;
align-items: center; ` export default { render() { return
<AppSetupContainer></AppSetupContainer>
} }
React 中组件通信写法对应的 Vue 中组件通信写法
数据传递(Provide / Inject)
- React 写法
// 父组件
import React from 'react'
const AppSetupContext = React.createContext()

function AppSetup() {
  const state = {
    hello: 'hello'
  }

  return (
    <AppSetupContext.Provider value={{  state }}>
    </AppSetupContext.Provider>
  )
}
export default AppSetup

export {
  AppSetupContext
}

// 子组件
import { AppSetupContext } from './app_setup.js'
import React, { useContext } from 'react'

function child () {
  const { state } =  useContext(AppSetupContext)
}
export default  child
- Vue 写法
<!--父组件-->
<script>
export default {
  provide() {
    return {
      state: {
        hello: "hello",
      },
    };
  },
};
</script>

<!--子组件-->
<script>
export default {
  inject: ["state"],
};
</script>
数据传递(props)- 父组件向子组件传递消息
- React 写法
import PropTypes from "prop-types";
class Welcome extends React.Component {
  render() {
    return <h1>Hello, {this.props.name}</h1>;
  }
}
Welcome.propTypes = {
  name: PropTypes.string, // 这个是类型定义
};
- Vue 写法
<script>
export default {
  props: {
    name: {
      type: String,
    },
  },
};
</script>
数据传递(props)- 子组件向父组件传递消息
- React 写法
// 子组件
import React, { Component } from 'react';
import PropTypes from 'prop-types';
class List3 extends Component {
  static propTypes = {
    hideConponent: PropTypes.func.isRequired,
  }
  render() {
    return (
      <div>
        哈哈,我是List3
        <button onClick={this.props.hideConponent}>隐藏List3组件</button>
      </div>
    );
  }
}
export default List3;

// 父组件
import React, { Component } from 'react';
import List3 from './components/List3';
export default class App extends Component {
  constructor(...args) {
    super(...args);
    this.state = {
      isShowList3: false,
    };
  }
  showConponent = () => {
    this.setState({
      isShowList3: true,
    });
  }

  hideConponent = () => {
    this.setState({
        isShowList3: false,
    });
  }

  render() {
    return (
        <div>
          <button onClick={this.showConponent}>显示Lists组件</button>
          {
              this.state.isShowList3 ?<List3 hideConponent={this.hideConponent} />:null
          }
        </div>
    );
  }
}
Vue 写法
<!-- 子组件 -->
<template>
  <div>
    哈哈,我是List3
    <button @click="hideConponent">隐藏List3组件</button>
  </div>
</template>

<script>
export default {
  props: {
    hideConponent: any,
  },
};
</script>
<template>
  <div>
    <button @click="showConponent">显示Lists组件</button>
    <List3 :hideConponent="hideConponent" />
  </div>
</template>

<script>
export default {
  data() {
    return {
      state: {
        isShowList3: fasle,
      },
    };
  },
  methods: {
    showConponent() {
      this.state.isShowList3 = true;
    },
    hideConponent() {
      this.state.isShowList3 = false;
    },
  },
};
</script>
使用工具转换
为了减轻工作量, 社区提供了个转换工具, 该工具虽不能做到 100% 转换, 但是也能达到 90% 以上的支持, 转换出来的 vue 支持的语法还是可能有包含 React 语法或者 React 专用的依赖, 这时候需要手动进行清理和替换
如果项目中使用了大量的 React 编写的组件, 还需要将其转成 vue 的组件
该工具只作为辅助工具使用
安装转换工具
工具 GitHub 地址:react-to-vue
npm install react-to-vue -g
工具使用
Usage: rtv [options] file(react component)


Options:

  -V, --version         output the version number
  -o --output [string]  the output file name
  -t --ts               it is a typescript component
  -h, --help            output usage information

 # demo

 rtv demo.js
 rtv demo.js -o demo-vue.js
工具转换原理
- 对于输入的文件首先使用 babylon 来解析, 生成 ast
- 如果文件是 typescript, 会去掉相应的 ts 描述
- 对 ast 进行遍历, 首先提取 propTypes 和 defaultProps
- 根据组件类型, 处理函数组件和类组件
- 在类组件里面, 需要转换生命周期, state 等信息
- 最后根据提取到的信息拼接成 vue 组件, 通过 prettier-eslint 来美化
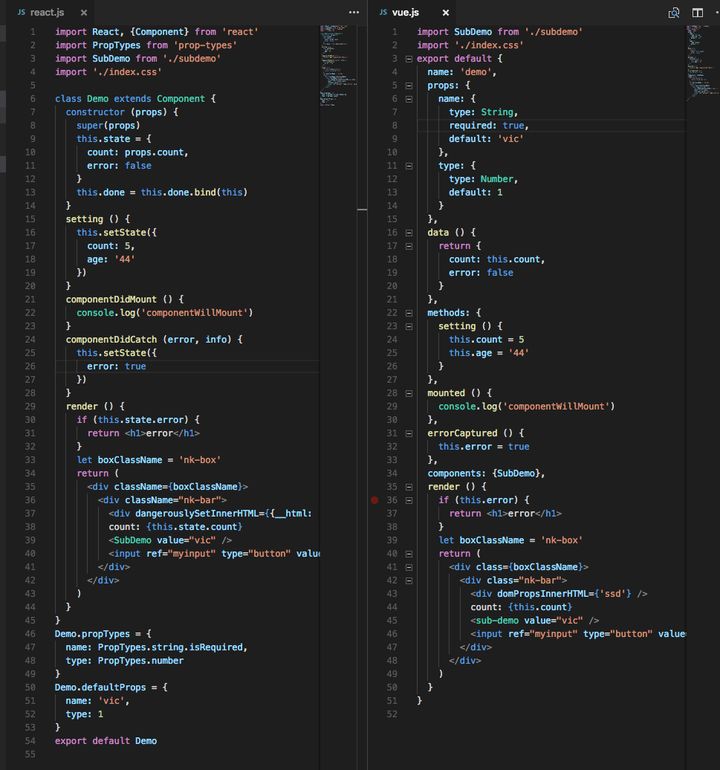
工具转换前后对比

上述的转换只是用来转换 React 页面的, 但是并不能转换 React 中的路由管理和状态管理, 这些需要我们自己实现其相同逻辑

