使用 vuepress 更新我的博客
前言
嗯~, 没错, 博客又迎来一次重大的更新, 此次更新不再采用 hexo 这个静态博客解决方案, 将采用 vuepress 这一静态博客解决方案。本博文将会从搭建博客到部署上线进行较详细的介绍。
开始你的博客
前期准备
VuePress 官方文档, 不管怎样这份文档多多少少都得阅读一遍吧
vuepress-theme-reco 博客主题文档, 如果你用的博客主题和我的一样的话, 这份文档也该阅读一遍吧, 如果不是的话或是你找到了更加优秀主题的话请你私信给我
安装博客主题 CLI
npm i -g vuepress # 如果可以的话, 建议您 vuepress 可以全局安装一下依赖, 当然不装也没啥大问题
npm install @vuepress-reco/theme-cli -g
创建一份基础的 DEMO
命令行会已一问一答的方式指引你创建一份新的博客, 按照提示进行配置即可
theme-cli init my-blog
安装依赖
cd my-blog
npm install
预览
这一步可分为开发模式预览和线上模式预览。 开发模式预览指未发布前自己个儿边写博文边看效果(PS:可自动刷新浏览器);线上模式预览指准备发布了,打包之后查看线上的效果
开发模式预览
npm dev # 打开浏览器即可浏览, 网址: 127.0.0.1:8080
线上模式预览
npm build
server public # 需要提前安装 serve(开启本地的一个服务器, 执行命令 npm i -g serve)
新的一篇文章
提示
该博客主题 CLI 没有像 hexo 的 CLI 一样提供创建文章的功能, 所以在此自己就撸了个 CLI 工具, 有需要的向下看
上 GitHub 地址: vuepress-article-cli
安装 CLI 工具
npm i vuepress-article-cli -g
使用
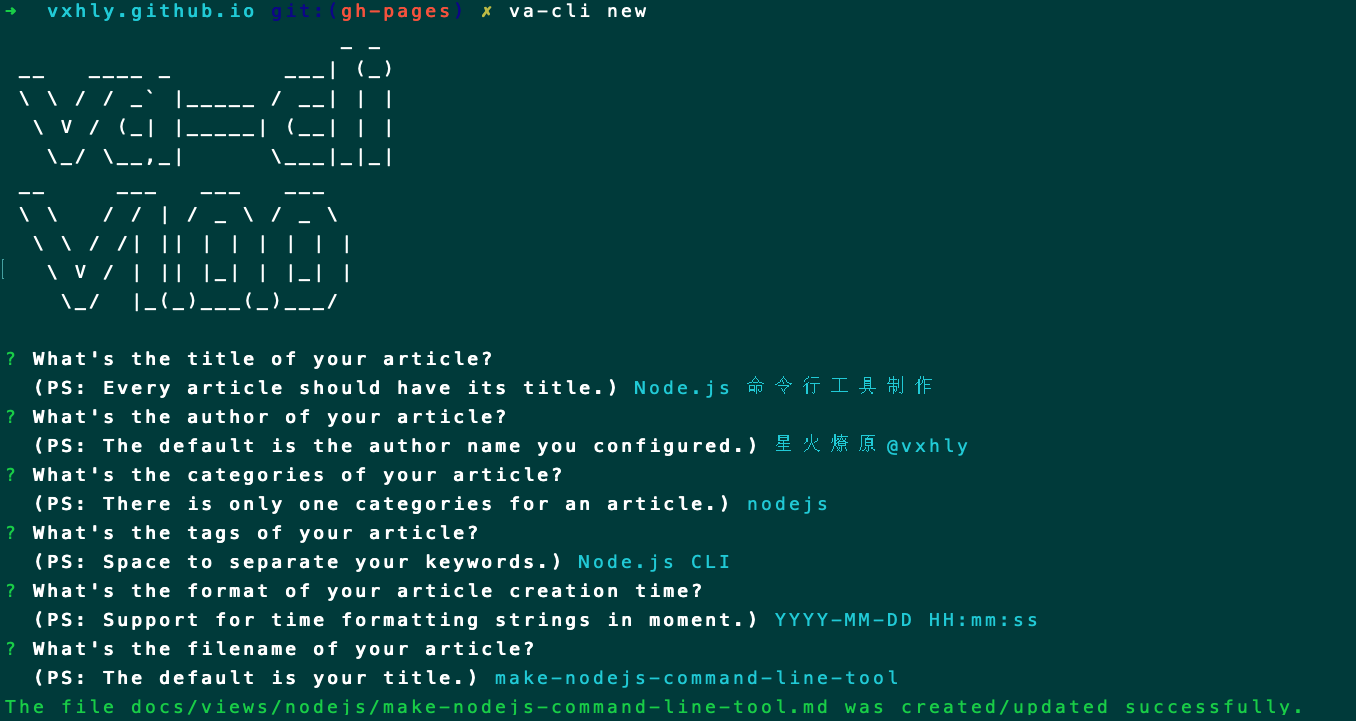
新建一篇文章
va-cli new
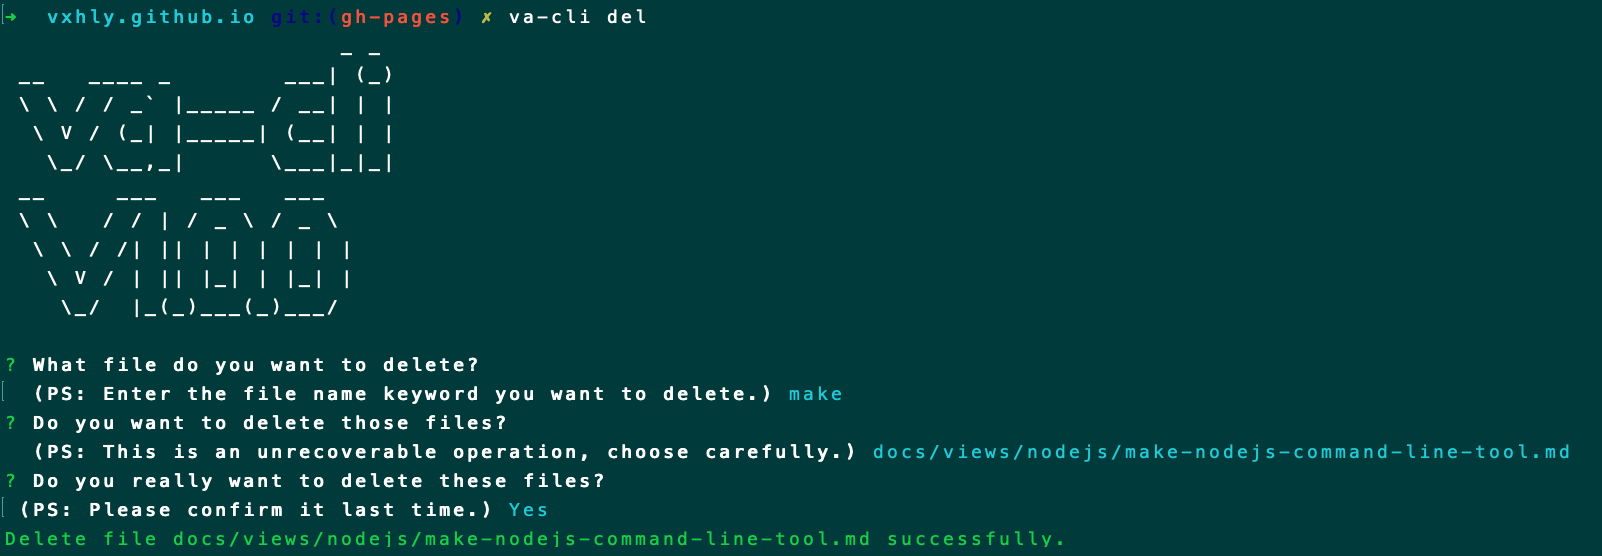
批量删除文章
va-cli del
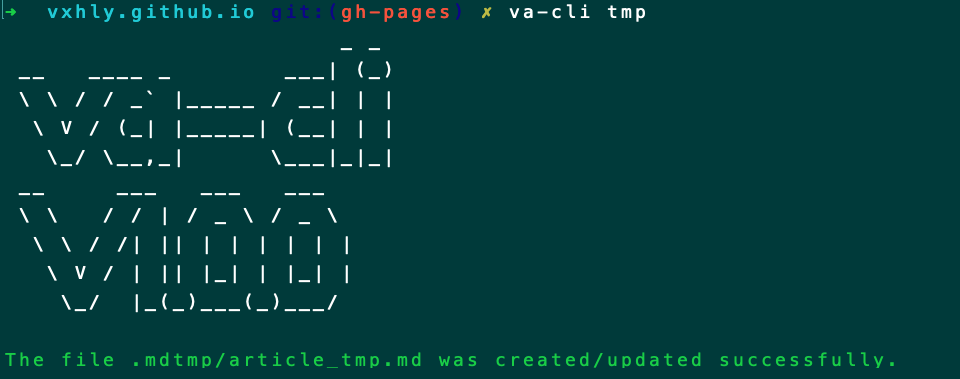
创建模版文件
va-cli tmp
进阶配置
经过上面的一系列折腾, 就能开始使用 VuePress 这个博客了
提示
以下只提供 vuepress-theme-reco 博客主题文档 中未提及的配置项
last-updated
注意
无需重新按照该插件, 直接进入配置即可, 这个插件也可不进行配置, 至于为啥要在本博文中写出(PS: 默认显示的时间格式可读性比较差, 所以需要进行格式化一下)
显示最后的更新时间插件, 先上插件文档 @vuepress/last-updated
再上配置, /.vuepress/config.js
module.exports = {
  plugins: [
    [
      "@vuepress/last-updated",
      {
        transformer: (timestamp, lang) => {
          // 不要忘了安装 moment
          // moment 时间格式化文档戳这里 http://momentjs.cn/
          const moment = require("moment");
          moment.locale(lang);
          return moment(timestamp).fromNow();
        },
      },
    ],
  ],
};
medium-zoom
注意
无需重新按照该插件, 直接进入配置即可
插件大图预览, 先上插件文档 @vuepress/medium-zoom
再上配置, /.vuepress/config.js
module.exports = {
    plugins: [
        ['@vuepress/medium-zoom': {
            selector: ".page img",
            options: {
                margin: 16,
                background: "#202124de",
                scrollOffset: 0
            }
        }]
    ]
}
pwa
注意
你的 VPS 服务器必须支持 HTTPS, 否则 PWA 将会失效, 当然如果你和我一样使用 GitHub 的 pages 服务的话, 就无须担心这一点
必须重新依赖该插件, 否则尽管配置了也不会加载 pwa
插件 PWA(PS:关于 PWA 的知识戳这里 PWA), 先上插件文档 @vuepress/pwa
按照文档中的步骤来, 第一:在 .vuepress/public 提供 Manifest 和 icons
一份 manifest.json 的例子
{
  "name": "Coding and Fixing",
  "short_name": "Coding and Fixing",
  "start_url": "./index.html",
  "display": "fullscreen",
  "background_color": "#000000",
  "theme_color": "#22979b",
  "icons": [
    {
      "src": "./icons/android-chrome-192x192.png",
      "sizes": "192x192",
      "type": "image/png"
    },
    {
      "src": "./icons/android-chrome-512x512.png",
      "sizes": "512x512",
      "type": "image/png"
    },
    {
      "src": "./icons/apple-touch-icon-60x60.png",
      "sizes": "60x60",
      "type": "image/png"
    },
    {
      "src": "./icons/apple-touch-icon-76x76.png",
      "sizes": "76x76",
      "type": "image/png"
    },
    {
      "src": "./icons/apple-touch-icon-120x120.png",
      "sizes": "120x120",
      "type": "image/png"
    },
    {
      "src": "./icons/apple-touch-icon-152x152.png",
      "sizes": "152x152",
      "type": "image/png"
    },
    {
      "src": "./icons/apple-touch-icon-180x180.png",
      "sizes": "180x180",
      "type": "image/png"
    },
    {
      "src": "./icons/msapplication-icon-144x144.png",
      "sizes": "144x144",
      "type": "image/png"
    }
  ]
}
接下来就是 icons 了, 根据你配置的 manifest.json 进行裁剪图标即可
第二:在 .vuepress/config.js 中添加配置(PS:该步骤略过, 文档中已经提供了)
部署之后, 你会神奇的发现在你浏览器地址栏的右边出现了一个 + 号的图标, 小主可点击本博客上的 + 号的图标查看效果
copyright
注意
必须重新依赖该插件, 否则尽管配置了也不会加载
指定页面复制行为的插件, 先上插件文档 vuepress-plugin-copyright
再上配置, /.vuepress/config.js
module.exports = {
  plugins: [
    [
      "copyright",
      {
        // 更多配置项以及配置项说明上 https://github.com/vuepress/vuepress-plugin-copyright 查看
        noCopy: true,
        minLength: 150,
        disabled: false,
        noSelect: true,
      },
    ],
  ],
};
clipboard-copy
提示
此插件纯粹是自己为了配合上一个插件自己写的一份一键复制插件, 暂未发布, 下面贴出代码供米娜桑参考(PS:效果米娜桑可以对下面的代码进行一键复制即可看到)
clipboard-copy.js
const { resolve } = require("path");

module.exports = (options, context) => ({
  define: {
    COPY_SELECTOR: options.copy_selector || 'div[class*="language-"] pre',
    COPY_ASIDE: options.copy_selector || 'div[class*="aside-code"] aside',
  },
  clientRootMixin: resolve(__dirname, "clientRootMixin.js"),
});
clientRootMixin.js
import "./style.css";

import { message } from "ant-design-vue";
import "ant-design-vue/lib/message/style/css";
message.config({
  top: `100px`,
});

export default {
  data() {
    return {
      zoom: null,
    };
  },

  mounted() {
    this.updateCopy();
  },

  updated() {
    this.updateCopy();
  },

  methods: {
    updateCopy() {
      setTimeout(() => {
        document
          .querySelectorAll(COPY_SELECTOR)
          .forEach(this.generateCopyButton);
        document.querySelectorAll(COPY_ASIDE).forEach(this.generateCopyButton);
      }, 1000);
    },
    generateCopyButton: function (parent) {
      if (parent.classList.contains("codecopy-enabled")) return;
      const copyElement = document.createElement("span");
      copyElement.className = "code-copy iconfont reco-api";
      copyElement.title = "Click to Copy to Clipboard";
      copyElement.addEventListener("click", () => {
        this.copyToClipboard(parent.innerText);
      });
      parent.appendChild(copyElement);
      parent.classList.add("codecopy-enabled");
    },
    copyToClipboard: function (str) {
      const el = document.createElement("textarea");
      el.value = str;
      el.setAttribute("readonly", "");
      el.style.position = "absolute";
      el.style.left = "-9999px";
      document.body.appendChild(el);
      const selected =
        document.getSelection().rangeCount > 0
          ? document.getSelection().getRangeAt(0)
          : false;
      el.select();
      document.execCommand("copy");
      message.success("复制成功,快去粘贴使用吧 !!!");
      document.body.removeChild(el);
      if (selected) {
        document.getSelection().removeAllRanges();
        document.getSelection().addRange(selected);
      }
    },
  },
};
style.css
.code-copy {
  color: #aaa;
  display: inline-block;
  cursor: pointer;
}

div[class*="language-"] pre .code-copy,
div[class*="aside-code"] aside .code-copy {
  position: absolute;
  z-index: 1000;
  top: 5px;
  right: 40px;
  opacity: 0;
  font-size: 16px;
}

div[class*="language-"] pre:hover .code-copy,
div[class*="aside-code"] aside:hover .code-copy {
  opacity: 1;
}

.content pre,
.content pre[class*="language-"] {
  overflow-y: hidden;
}

div[class*="language-"] pre,
div[class*="language-"] pre[class*="language-"] {
  position: static !important;
}

div[class~="language-text"]:before {
  content: "text";
}

div[class~="language-yml"]:before {
  content: "yml";
}

div[class*="language-"] pre {
  user-select: text;
}

p code {
  user-select: all;
}
nest
提示
自己个写的对接 canvas-nest.js 的一个插件
页面 canvas-nest 背景插件, 先上插件文档 vuepress-plugin-nest
再上配置, /.vuepress/config.js
module.exports = {
  plugins: [
    [
      "nest",
      {
        // 更多配置项以及配置项说明上 https://github.com/vxhly/vuepress-plugin-nest 查看
        color: "255,0,255",
        count: 100,
        opacity: 0.7,
      },
    ],
  ],
};
sitemap
注意
如果你的网站希望被搜索引擎搜索到的话, 强烈这个插件需要安装
生成站点地图插件, 先上插件文档 vuepress-plugin-sitemap
再上配置, /.vuepress/config.js
module.exports = {
  plugins: [
    [
      "sitemap",
      {
        hostname: "", // 替换成你的 GitHub 地址
        exclude: ["/404.html"],
        dateFormatter: (time) => {
          return time;
        },
      },
    ],
  ],
};
部署上线
提示
下面提供的是 GitHub Pages + Travis CI 的部署上线方式, 如果你有更简单的或者更好的方式请你一定私信给我
部分未提及的配置或者其他部署方式, 看这里 VuePress 部署
自动向 GitHub 提交代码脚本
在你的项目目录中创建 deploy.sh , 自行修改下方中的注释行代码
注意
这边的分支不能提交到 master 分支上, 因为 GitHub Pages 服务中指定了 master 分支为静态页面发布分支, 所以需要在本地创建一个名为 gh-pages 的分支, 我们的博客源码全部托管在这个分支上(当然你也可以叫其他名字)
#!/usr/bin/env sh

# 确保脚本抛出遇到的错误

set -e

date= `date +"%Y-%m-%d %H:%M:%S"`
commitmsg='Site updated: '$date
git add -A
git commit -m "$commitmsg"

# 如果发布到 https://<USERNAME>.github.io

# 将 <USERNAME> 替换成你的 GitHub 名字

# git push -f git@github.com:<USERNAME>/<USERNAME>.github.io.git gh-pages:gh-pages
自动化脚本
在你的项目目录中创建 .travis.yml , 更多的配置项戳这里 Travis CI Deployment
language: node_js
node_js: + lts/*

install: + npm ci

script: + npm run build

deploy:
  provider: pages
  skip-cleanup: true
  local_dir: public
  github-token: $GITHUB_TOKEN # a token generated on github allowing travis to push code on you repository
  target-branch: master
  verbose: true
  keep-history: true
  on:
    branch: gh-pages
branches:
  only:
    - gh-pages
自动化部署
GitHub Actions
在项目中创建 .github 文件夹, GitHub Actions 将会自动执行该目录下的所有 .yml 文件
name: VUEPRESS DEPLOY

on: # 触发条件
  # 每当 push 到 master 分支时触发部署
  push:
    branches: [master]
  # 手动触发部署
  workflow_dispatch:

jobs:
  docs:
    runs-on: ubuntu-latest

    steps:
      - uses: actions/checkout@v2
        with:
          # “最近更新时间” 等 git 日志相关信息, 需要拉取全部提交记录
          fetch-depth: 0

      - name: Setup Node.js
        uses: actions/setup-node@v1
        with:
          # 选择要使用的 node 版本
          node-version: "14"

      # 缓存 node_modules
      - name: Cache dependencies
        uses: actions/cache@v2
        id: yarn-cache
        with:
          path: |
            **/node_modules
          key: ${{ runner.os }}-yarn-${{ hashFiles('**/yarn.lock') }}
          restore-keys: |
            ${{ runner.os }}-yarn-

      # 如果缓存没有命中, 安装依赖
      - name: Install dependencies
        if: steps.yarn-cache.outputs.cache-hit != 'true'
        run: yarn --frozen-lockfile

      # 运行构建脚本
      - name: Build VuePress site
        run: yarn build

      # 查看 workflow 的文档来获取更多信息
      # @see https://github.com/crazy-max/ghaction-github-pages
      - name: Deploy to GitHub Pages
        uses: crazy-max/ghaction-github-pages@v2
        with:
          # 部署到 gh-pages 分支
          target_branch: gh-pages
          # 部署目录为 VuePress 的默认输出目录
          build_dir: publish-pages
        env:
          GITHUB_TOKEN: ${{ secrets.GITHUB_TOKEN }}
Travis CI
非常重要
需要想你的仓库中正确提交你的 package-lock.json, 否则 Travis CI 在执行 npm ci 时可能会发生错误
当然如果你并不想这么做的的话, 可以将 npm ci 替换成 npm install
首先进入 travis-ci 官网, 将对应的项目启用 Travis CI
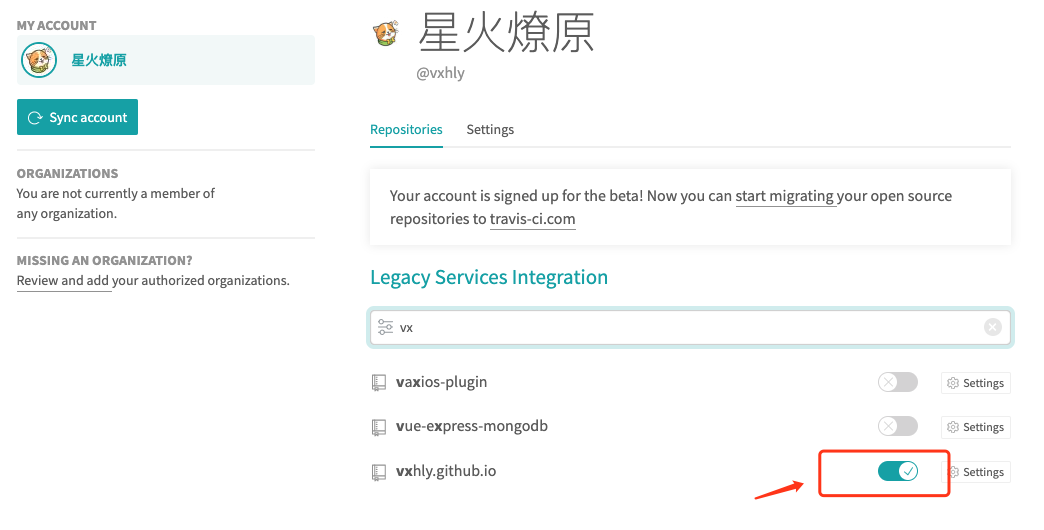
点进去之后可以进行更多的配置
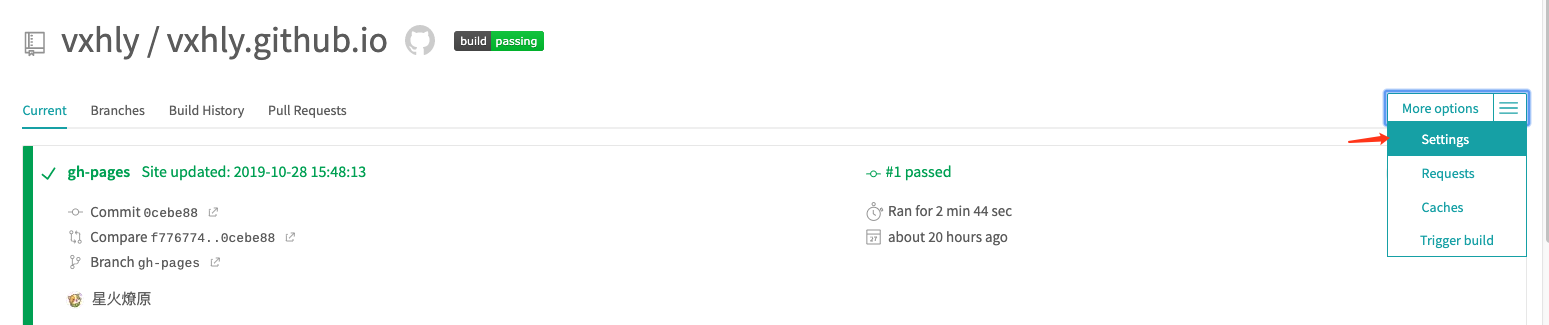
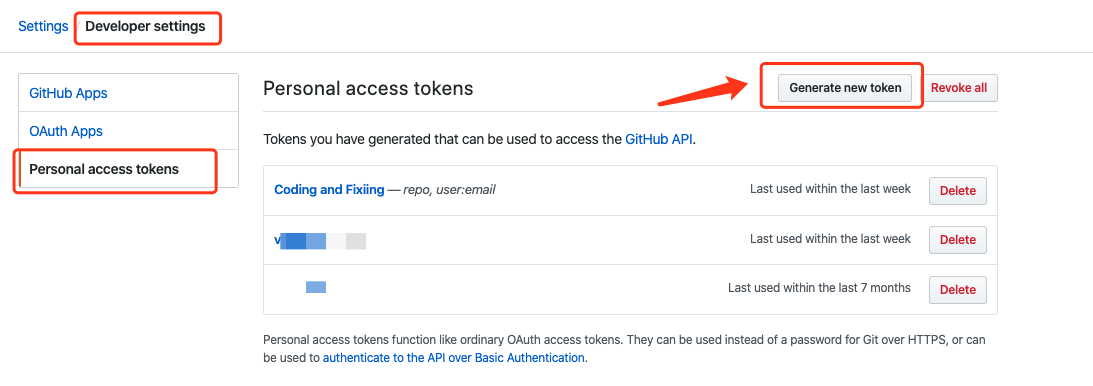
生成你的 GitHub Token, 首先获取这个 token, 进入 Github 设置, 左下的 Developer settings
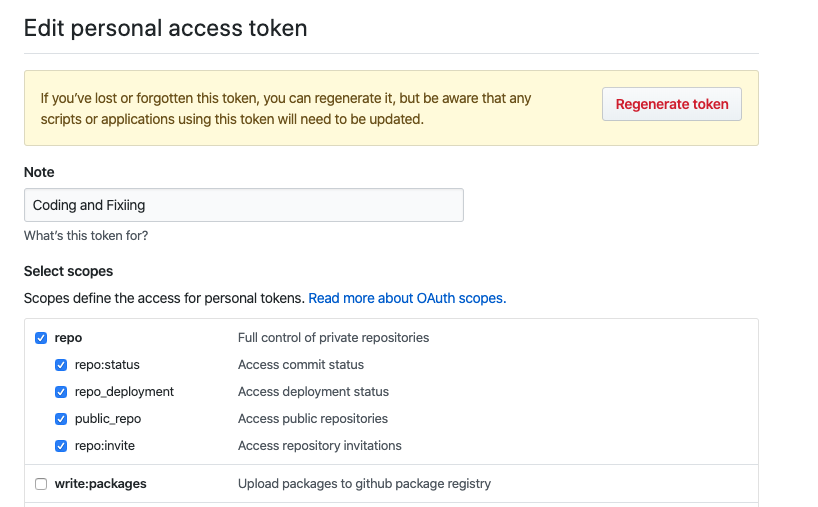
添加描述, 这里只需勾选 repo , 如果需要其他的配置自行勾选
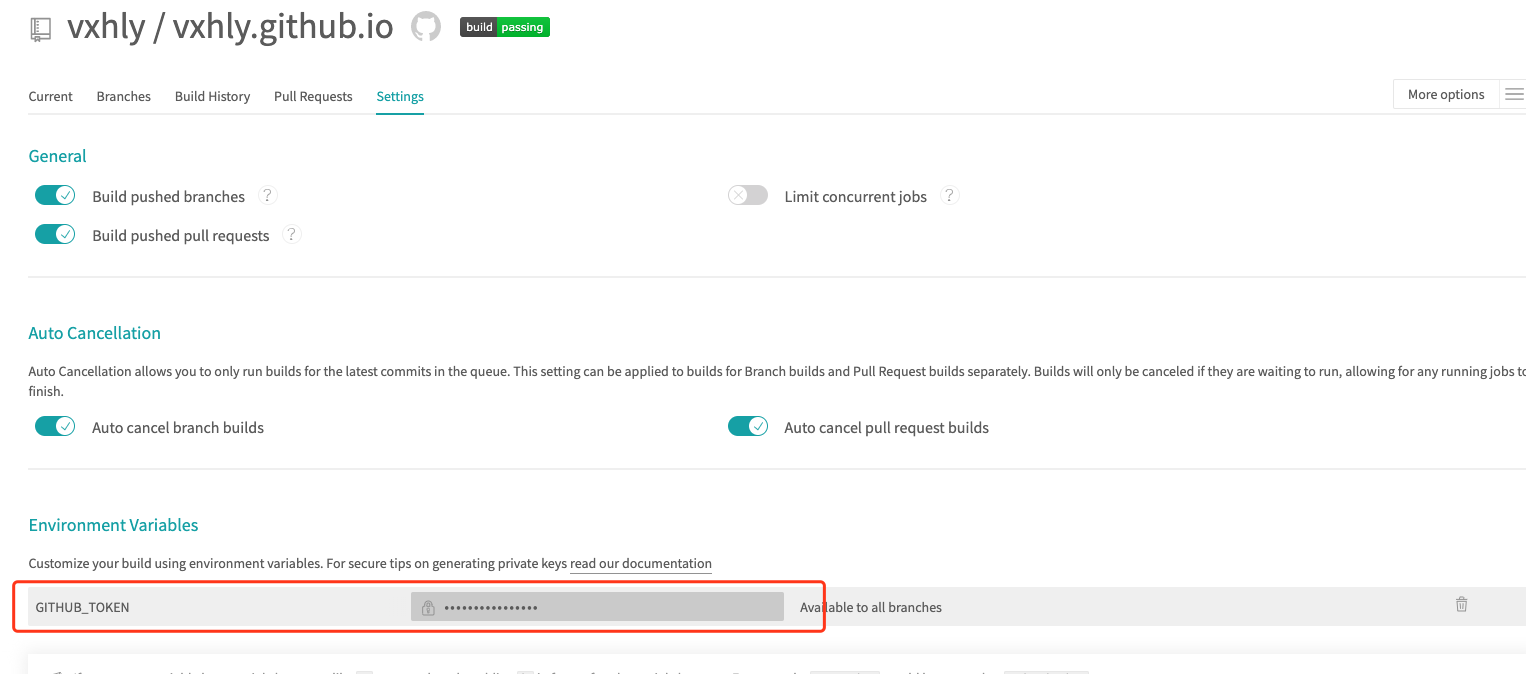
保存之后将会生成的 token, 将生成的 token 放入 Travis 配置中
注意
这边配置的变量名需要和 .travis.yml 中指定的名字一样, 这边使用的变量名为 GITHUB_TOKEN
至此, 你可以进行发布代码操作了, 执行下面的命令即可将代码提交到你的 GitHub 上了
npm run deploy
代码提交之后 Travis 也开始对你提交的代码进行编译操作了, 编译成功之后将会自动的把 public 目录提交到你的 master 分支了
注意
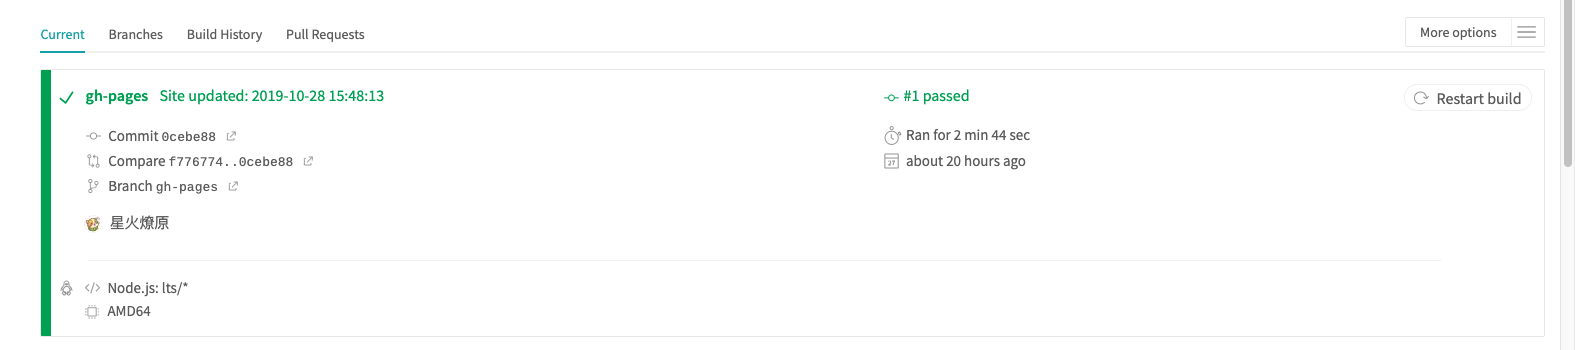
状态颜色一定要是绿色才代表编译并且部署成功了
拓展阅读
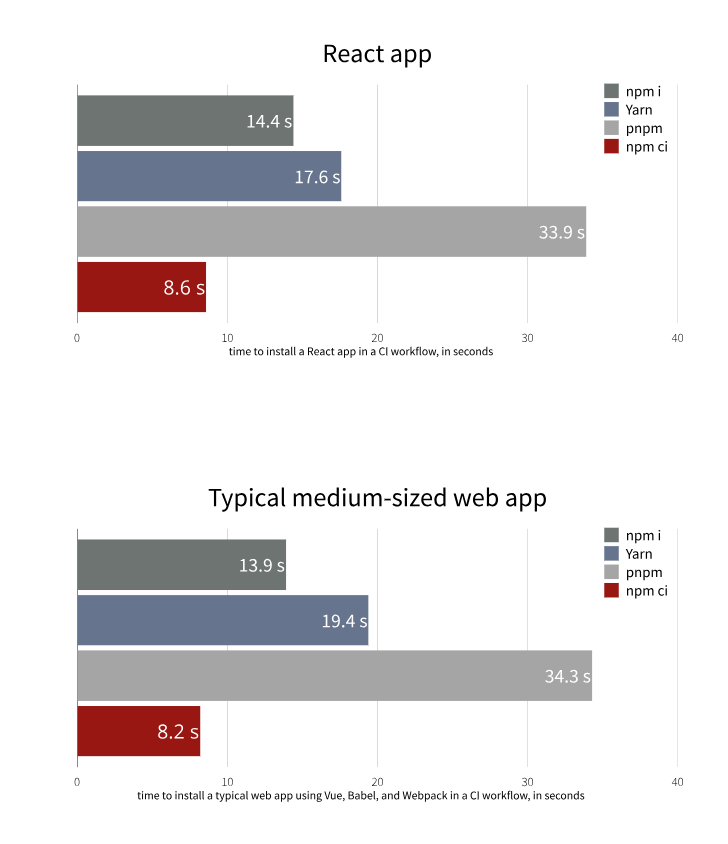
NPM 5.7.0 引入了一种新的安装依赖的方式:
npm ci
它是从 package-lock.json 文件安装依赖, 具有快以及可靠优点, 关于速度的比较引用官方图
官方有下面补充:
- 项目里面必须存在
package-lock.json或npm-shrinkwrap.json. - 如果
package lock里面依赖和package.json不一致,npm ci会报错并且退出, 而不是更新package lock文件 npm ci只能一次性安装整个工程的依赖, 不能使用这个命令单独添加依赖- 如果
node_modules文件夹存在, 它会在安装依赖之前删除这个文件夹 - 它不会改变
package.json或者任何package-locks
注意
如果想要使 vuepress 支持编译 node_modules 目录下的 jsx 代码时(前端框架 vue), 可进行下列操作
先安装 jsx 的转换依赖 @vue/babel-preset-jsx
# for yarn:
yarn add -D @vue/babel-preset-jsx @vue/babel-helper-vue-jsx-merge-props
# for npm:
npm install -D @vue/babel-preset-jsx @vue/babel-helper-vue-jsx-merge-props
安装 babel 的环境包
# for yarn:
yarn add -D @babel/preset-env
# for npm:
npm install -D @babel/preset-env
在 .vuepress/config.js 中添加以下代码
module.exports = {
  configureWebpack: {
    // 用于解析 node_modules 目录下的 jsx 代码
    module: {
      rules: [
        {
          test: /\.m?js$/,
          include: /node_modules/,
          use: {
            loader: "babel-loader",
            options: {
              presets: [
                ["@babel/preset-env", { targets: "defaults" }],
                [
                  "@vue/babel-preset-jsx",
                  {
                    vModel: true, // vModel syntactic sugar
                    functional: true, // @vue/babel-sugar-functional-vue - Functional components syntactic sugar
                    injectH: true, // Automatic h injection syntactic sugar
                    vOn: true, // vOn syntactic sugar
                    compositionAPI: false, // Enables @vue/babel-sugar-composition-api-inject-h and @vue/babel-sugar-composition-api-render-instance, support returning render function in setup
                  },
                ],
              ],
            },
          },
        },
      ],
    },
  },
};