vue3.x 学习笔记
前言
vue3.x 已经正式发布了, 由此又有一个大坑需要我们前端工程师来填, 本篇将记录我在学习 vue3.x 时所遇到的坑, 也记录了 vue3.x 的具体更新内容以及与 vue2.x 的对比。
看文档很重要
学习 vue 3.x 的第一步当然是上文档:vue3 官方文档
提示
全新版本号 3.2.31
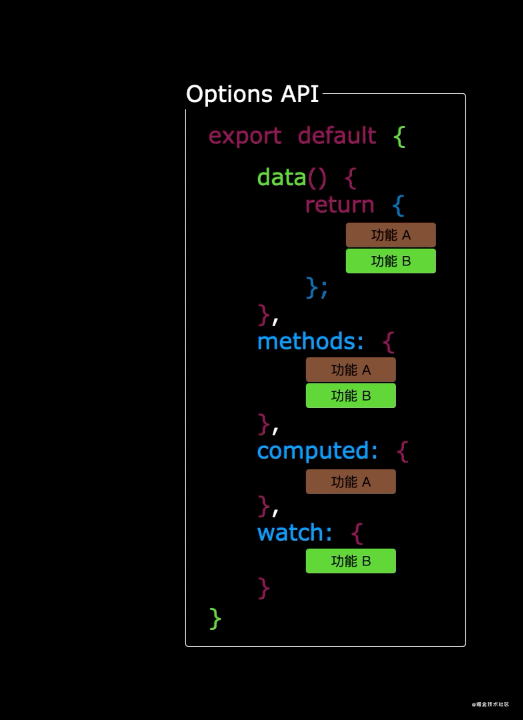
回顾 Option Api
众所周知, Vue3.0 带来了一个全新的特性——Composition API。字面意思就是“组合 API”, 它是为了实现基于函数的逻辑复用机制而产生的。
提示
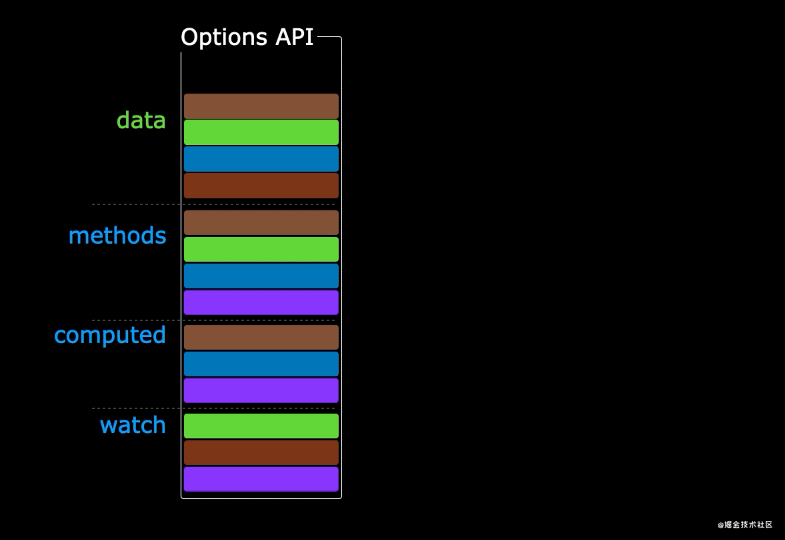
在了解 Composition Api 之前, 首先回顾下我们使用 Option Api 遇到的问题, 我们在 Vue2 中常常会需要在特定的区域(data, methods, watch, computed...)编写负责相同功能的代码。
Option Api 的缺陷
提示
随着业务复杂度越来越高, 代码量会不断的加大;由于相关业务的代码需要遵循 option 的配置写到特定的区域, 导致后续维护非常的复杂, 代码可复用性也不高。
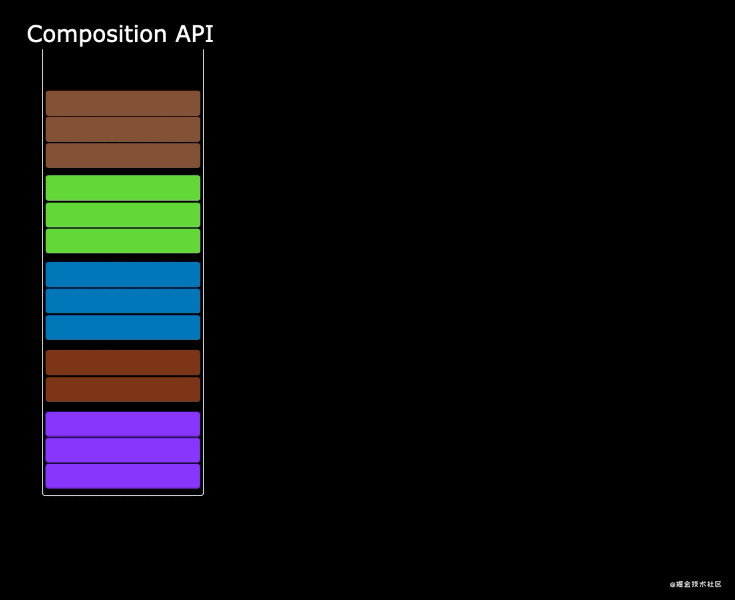
Composition Api
提示
显然我们可以更加优雅的组织我们的代码, 函数。让相关功能的代码更加有序的组织在一起
vue3.x 的真香警告
重点
Higlights:
- Performance 【高性能】
- Tree-shaking support 【更小的体积】
- Composition API 【合成 API】
- Fragment, Teleport, Suspense 【片段, 传送, 悬念】
- Better TypeScript support 【更好的 ts 支持】
- Custom Renderer API 【自定义渲染 API】
合成 API
Composition API
- Usable alongside existing Options API 【可与现有选项 API 一起使用】
- Flexible logic composition and reuse 【柔性逻辑组合与重用】
- Reactivity module can be used as a standalone library 【反应性模块可用作独立库】
更好的 ts 支持
Better TypeScript support
- Codebase written inTS w/ auto-generated type definitions 【CodeBase 编写的 INT w/自动生成的类型定义】
- API is the same in JS and TS 【API 在 JS 和 TS 中是相同的】
- In fact, code will also be largely the same 【实际上, 代码在很大程度上也是相同的】
- TSX support 【TSX 支持】
- Class component is still supported 【类组件仍然受支持】
- (vue-class-component@next is currently in alpha) 【(vue-class-Component@next 当前在 alpha 中)】
高性能
Performance:
- Rewritten virtual dom implementation 【重写虚拟域实现】
- Compiler-informed fast paths 【编译器通知的快速路径】
- More efficient component initialization 【更有效的组件初始化】
- 1.3~2x better update performance 【1.3~2 倍更好的更新性能】
- 2~3x faster 【SSR 2~3 倍快 SSR】
用于处理大规模用例的新 API
- reactive
- ref
- computed
- readonly
- watchEffect
- watch
- unref
- toRef
- toRefs
- isRef
- isProxy
- isReactive
- isReadonly
- customRef
- markRaw
- shallowReactive
- shallowReadonly
- shallowRef
- toRaw
Vue2.x VS Vue3.x
| Vue 2.x | VS | Vue 3.x |
|---|---|---|
| defineproperty | 响应式 | Proxy |
| Options API | 开发方式 | Composition API |
| 全部编译 | 文件体积 | 按需编译体积更小 |
| 只支持单个根节点 | 根节点 | 单个/多个根节点 |
| JavaScript+Flow | 底层源码 | TypeScript |
| - | update 渲染速度提升 | 1.3 ~ 1.6x |
| - | ssr 渲染速度提升 | 2x |
| IE8+ | IE 兼容 | 预计是 IE11+ |
| 2 种 | 使用方式 | 3 种 |
生命周期对照
Vue2.x 生命周期
beforeCreate, 在实例初始化之后, 数据观测 (data observer) 和 event/watcher 事件配置之前被调用。created, 在实例创建完成后被立即调用。在这一步, 实例已完成以下的配置:数据观测 (data observer), 属性和方法的运算, watch/event 事件回调。然而, 挂载阶段还没开始, $el 属性目前尚不可用。beforeMount, 在挂载开始之前被调用:相关的 render 函数首次被调用。mounted, 实例被挂载后调用, 这时el被新创建的vm.$el替换了。 如果根实例挂载到了一个文档内的元素上, 当 mounted 被调用时vm.$el也在文档内。beforeUpdate, 数据更新时调用, 发生在虚拟 DOM 打补丁之前。这里适合在更新之前访问现有的 DOM, 比如手动移除已添加的事件监听器。updated, 由于数据更改导致的虚拟 DOM 重新渲染和打补丁, 在这之后会调用该钩子。activated, 被 keep-alive 缓存的组件激活时调用。deactivated, 被 keep-alive 缓存的组件停用时调用。beforeDestroy, 实例销毁之前调用。在这一步, 实例仍然完全可用。destroyed, 实例销毁后调用。该钩子被调用后, 对应 Vue 实例的所有指令都被解绑, 所有的事件监听器被移除, 所有的子实例也都被销毁。errorCaptured, 当捕获一个来自子孙组件的错误时被调用。
生命周期函数执行顺序
beforeCreate => created => beforeMount => mounted => beforeUpdate => updated => beforeDestroy => destroyed
Vue3.x 生命周期
被替换的
- beforeCreate -> setup()
- created -> setup()
重命名
- beforeMount -> onBeforeMount
- mounted -> onMounted
- beforeUpdate -> onBeforeUpdate
- updated -> onUpdated
- beforeDestroy -> onBeforeUnmount
- destroyed -> onUnmounted
- errorCaptured -> onErrorCaptured
新增
- onRenderTracked
- onRenderTriggered
Vue3.x 中建议使用 setup() 代替 beforeCreate 、 created 钩子函数, 虽然 Vue3.x 兼容 Vue2.x 的大部分语法, 但是在 Vue3.x 中慎用以下钩子函数, 以下的生命周期钩子函数被改名后, 在 Vue3.x 中将不会再有 beforeDestroy 和 destroyed
- beforeDestroy -> onBeforeUnmount
- destroyed -> onUnmounted
生命周期函数执行顺序
setup => onBeforeMount => onRenderTracked => onMounted => onRenderTriggered => onBeforeUpdate => onRenderTracked => OnUpdated => onBeforeUnmount => onUnmounted
vue3.x 弃用的语法或者 API
提示
- 下方内容可在官方文档中找到对照:迁移至 Vue 3
- 当然也可以在这里找到对照:vue 3.x 如何有惊无险地快速入门
- 更多的变更提案参考:Vue RFC
全局配置
删除了
Vue.config.silent 、 Vue.config.productionTip 、 Vue.config.keyCodes
这里需要注意的是 Vue.config.ignoredElements 被修改成 app.config.isCustomElement vue2.x 中的写法
Vue.config.ignoredElements = ["my-el", /^ion-/];
vue3.x 中的写法
const app = Vue.createApp();
app.config.isCustomElement = (tag) => tag.startsWith("ion-");
vue3.x 中不再支持 prototype 的方式给 Vue 绑定静态方法, 可以参考以下的方法进行改进与修正
// Before
Vue.prototype.$http = () => {};
// After
const app = Vue.createApp({});
app.config.globalProperties.$http = () => {};
全局 API
删除了
Vue.extend 、 Vue.set 、 Vue.delete
这里需要注意的是 Vue.set 、 Vue.delete 这两个 API 在正式版的 vue3.x 中是已经删除了, 但是在 vue3.x 的兼容版本中还是被保留了
对比 2.x API
Vue.nextTickVue.observableVue.versionVue.compile(only in full builds)Vue.set(only in compat builds)Vue.delete(only in compat builds)
选项 / 数据
删除了
data-object 的写法
在 vue3.x 中所有的东西都以函数式声明方式, 当然包含 data 的声明方式也弃用了对象式声明方式
vue2.x 中的写法
var data = {
  a: 1,
};

// 直接创建一个实例
var vm = new Vue({
  data: data,
});
vue3.x 中的写法
import { createApp } from "vue";

createApp().mount(
  {
    data() {
      return {
        a: 1,
      };
    },
  },
  "#app"
);
选项 / 资源
删除了
filters
vue2.x 中的写法
<template>
  <div>{{ hello | toUpperCase }}</div>
</template>

<script>
export default {
  data() {
    return {
      hello: "hello word",
    };
  },
  filters: {
    toUpperCase(val) {
      return val.toUpperCase();
    },
  },
};
</script>
vue3.x 中已经将 filters 这一个 API 进行删除了, 所以在 vue3.x 中更加推荐使用 method 或者 computed
<template>
  <div>{{ helloUp }}</div>
</template>

<script>
export default {
  data() {
    return {
      hello: "hello word",
    };
  },
  computed: {
    helloUp() {
      return this.hello.toUpperCase();
    },
  },
};
</script>
实例方法 / 事件
删除了
$on 、 $once 、 $off
vue2.x 中的写法
// eventHub.js

const eventHub = new Vue();

export default eventHub;
// ChildComponent.vue
import eventHub from "./eventHub";

export default {
  mounted() {
    // adding eventHub listener
    eventHub.$on("custom-event", () => {
      console.log("Custom event triggered!");
    });
  },
  beforeDestroy() {
    // removing eventHub listener
    eventHub.$off("custom-event");
  },
};
vue3.x 中已经将 $on 、 $off 、 $once 方法进行完全删除。在 vue3.x 中更加推荐使用 $emit 或者使用 vuex。
在 vue3.x 里也可以这样写
<!-- 子组件 -->
<template>
  <button @click="handleClick">按钮</button>
</template>

<script>
export default {
  name: "Hello",
  emits: ["childClick"],
  setup(props, { emit }) {
    const handleClick = () => {
      emit("childClick", "hello");
    };
    return {
      props,
      handleClick,
    };
  },
};
</script>
<!-- 父组件 -->
<template>
  <Hello @childClick="parentClick" />
</template>

<script>
import Hello from "./Hello.vue";

export default {
  name: "App",
  components: {
    Hello,
  },
  methods: {
    parentClick(e) {
      console.log(e);
    },
  },
};
</script>
也可采用第三方库 mitt 来实现组件通信
import mitt from "mitt";
const emitter = mitt();
// listen to an event
emitter.on("foo", (e) => console.log("foo", e));
// fire an event
emitter.emit("foo", {
  a: "b",
});
实例 property
删除了
$scopedSlots
vue3.x 中统一了常规插槽和作用域插槽, this.$slots 将插槽公开为功能, this.$scopedSlots 已经被删除了, 在 vue3.x 中只需将 this.$scopedSlots 替换成 this.$slots 即可
删除了
$listeners
vue3.x 中 $attrs 的包含父范围属性绑定和未识别(提取)为组件 prop 或自定义事件的事件。需要将 $listeners 改成 $attrs
删除了
$children 、 $isServer
指令
删除了
v-bind.sync
vue2.x 中的写法
<!-- 子组件 -->
<template>
  <div v-show="visible" @click="$_handlerCLick"></div>
</template>

<script>
export default {
  name: "custom-model",
  props: {
    visible: {
      type: Boolean,
      default: false,
    },
  },
  methods: {
    $_handlerCLick() {
      this.$emit("update:visible", false);
    },
  },
};
</script>
<!-- 父组件 -->
<template>
  <custom-model :visible.sync="show"></custom-model>
</template>
<script>
export default {
  data() {
    return {
      show: false,
    };
  },
};
</script>
vue 3.x 中只需将 v-bind.sync 的语法替换成 v-model 即可
<!-- 父组件 -->
<template>
  <custom-model v-model:visible="show"></custom-model>
</template>
<script>
export default {
  data() {
    return {
      show: false,
    };
  },
};
</script>
删除了
v-on.keyup 中的的 keyCodes 形式作为的修饰符
vue2.x 中的写法
<!-- keyCode version -->
<input v-on:keyup.13="submit" />

<!-- alias version -->
<input v-on:keyup.enter="submit" />
vue3.x 中写法(由于 KeyboardEvent.keyCode 已弃用, 因此 Vue 3 也不再继续支持此功能。因此, 现在建议将 kebab-case 名称用于要用作修饰符的任何键。)
<!-- Vue 3 Key Modifier on v-on -->
<input v-on:keyup.delete="confirmDelete" />
内置组件
内置组件
当 <transition> 作为组件的根元素时, 外部切换不会触发过渡效果, 也就是说我们只能在 <transition> 内使用切换。
vue2.x 中的写法
<!-- modal component -->
<template>
  <transition>
    <div class="modal"><slot /></div>
  </transition>
</template>
<!-- usage -->
<template>
  <modal v-if="showModal">hello</modal>
</template>
vue3.x 中的写法
<!-- modal component -->
<template>
  <transition>
    <div v-if="show" class="modal"><slot /></div>
  </transition>
</template>
<!-- usage -->
<template>
  <modal :show="showModal">hello</modal>
</template>
重命名
重命名过滤类 v-enter 重命名成 v-enter-from , v-leave 重命名成 v-enter-from 。
.v-enter-from,
.v-leave-to {
  opacity: 0;
}

.v-leave-from,
.v-enter-to {
  opacity: 1;
}
特殊 attribute
删除了
slot 、 slot-scope 、 scope
vue2.x 中的写法
<template>
  <component-a>
    <template slot="header" slot-scope="{ text }"></template>
  </component-a>
</template>
vue3.x 中的写法
<template>
  <component-a>
    <template v-slot:header="{ text }"></template>
    <!-- 也可以使用简写 --->
    <template #header="{ text }"></template>
    <!-- 无作用域时 -->>
    <template #header></template>
  </component-a>
</template>
事件修饰符
删除了
.native
.native 这个修饰符原本是 vue1.x 版本的, 在 vue2.x 中仍然保留了这个修饰符, 但是在 vue3.x 中这个修饰符已经被完全移除了
内联模板
删除了
内联模板 inline-template 。参考地址:内联模板
在 Vue2.x 中, 在父组件引入子组件时, 会用到 inline-template 来使子组件的内容也得到展示, 在 Vue3 中, 这个功能将被移除, 目前 inline-template 使用的并不多。
样式 scoped
删除了
>>> 和 /deep/ 的支持
vue2.x 中的写法
/* 深度选择器 */
/*方式一:*/
>>> .foo {
}

/*方式二:*/
/deep/ .foo {
}

/*方式三*/
::v-deep .foo {
}
vue3.x 中的写法
/* 深度选择器 */
::v-deep(.foo) {
}

/* slot content 起作用 */
::v-slotted(.foo) {
}

/* 全局 */
::v-global(.foo) {
}
vue3.x 新增的语法或者 API
提示
- 下方内容可在官方文档中找到对照:迁移至 Vue 3
- 当然也可以在这里找到对照:vue 3.x 如何有惊无险地快速入门
- 更多的变更提案参考:Vue RFC
Composition API
文档
Vue 组合式 API 在 vue3.x 中不在提倡 mixins 了, Composition API 的引入是可以替换 mixins:Vue3 Composition API 如何替换 Vue Mixins
teleport
文档
按需引入
在 vue3.x 中不会把所有的 api 都打包进来, 只会 打包你用到的 api
// vue 2.x
import Vue from "vue";

Vue.nextTick(() => {});

const obj = Vue.observable({});

// vue 3.x
import Vue, { nextTick, observable } from "vue";

Vue.nextTick; // undefined

nextTick(() => {});

const obj = observable({});
片段
Overview
在 Vue3 中, 组件现在正式支持多根节点组件, 即片段!
在 2.x 中, 不支持多根组件, 并且在用户意外创建组件时会发出警告。结果, 许多组件被包装在一个 <div> 中, 以解决此错误。
<!-- Layout.vue -->
<template>
  <div>
    <header>...</header>
    <main>...</main>
    <footer>...</footer>
  </div>
</template>
在 3.x 中, 组件现在可以具有多个根节点!但是, 这确实需要开发人员明确定义属性应在何处分发。
<!-- Layout.vue -->
<template>
  <header>...</header>
  <main v-bind="$attrs">...</main>
  <footer>...</footer>
</template>
指令的钩子函数
提示
vue 3.x 将重新命名指令中的 API, 只为了更好的与组件生命周期保持一致
vue2.x 的自定义指令钩子函数
import Vue from "vue";

Vue.directive("my-directive", {
  bind: function (el, binding, vnode, oldVnode) {},
  inserted: function () {},
  update: function () {},
  componentUpdated: function () {},
  unbind: function () {},
});
vue3.x 的自定义指令钩子函数
import Vue from "vue";
const app = Vue.createApp({});

app.directive("highlight", {
  beforeMount(el, binding, vnode, prevVnode) {},
  mounted() {},
  beforeUpdate() {},
  updated() {},
  beforeUnmount() {}, // new
  unmounted() {},
});
指令动态参数
<!-- 非简写方式 -->
<div v-bind:[key]="value"></div>
<div v-on:[event]="handler"></div>
<foo>
  <template v-slot:[name]> Hello </template>
</foo>

<!-- 简写方式 -->
<div :[key]="value"></div>
<div @[event]="handler"></div>
<foo>
  <template #[name]> Hello </template>
</foo>
异步组件
vue2.x 的写法
// 局部注册
new Vue({
  ...rest,
  components: {
    a: () => import("./components/a.vue"),
  },
});
// 全局注册
Vue.component("async-comp", (resolve, reject) => ({
  component: () => imort("./components/a.vue"),
  loading: loadingComp, //异步组件加载时使用的组件
  error: errorComp, //加载失败时使用的组件
  delay: 200, //展示加载时组件的延时时间。默认值是 200 (毫秒)
  timeout: 3000, //如果提供了超时时间且组件加载也超时了, 则使用加载失败时使用的组件。默认值是: `Infinity`
}));
vue3.x 的写法
import { defineAsyncComponent } from "vue";

const AsyncComp = defineAsyncComponent(() => import("./Foo.vue"));
v-model
Overview
在变化方面, 概括地说:
BREAKING:当使用自定义组件时,
v-model的 prop 和事件名称发生了改变:- prop:
value=>modelValue; - event:
input=>update:modelValue;
- prop:
BREAKING:
v-bind的.sync修饰符和组件的model选项已经被删除了, 被替换的是v-model的绑定值;NEW:现在在同一个组件上可以进行多个
v-model的绑定;NEW:添加创建自定义
v-model的修饰器功能;
<template>
  <custom-model
    v-model:visible="show"
    v-model:inputName="inputName"
  ></custom-model>
</template>
<script>
export default {
  data() {
    return {
      show: false,
      inputName: "",
    };
  },
};
</script>
v-is
Overview
与 vue2.x 中的 <component /> 组件中的 :is 属性是一致的效果
<table>
  <tr v-is="'blog-post-row'"></tr>
</table>
vuex4.x 的修改
提示
既然我们选择使用了 vue3.x, 那么我们也顺便看看 vuex 中的最新版本有哪些变化吧
参考来源
- vuex README
- 更多的变更提案参考:Vue RFC
导入方式
// 旧版
import Vuex from "vuex";
export default new Vuex.Store({
  // ...
});
// 新版
import { createStore } from "vuex";
export default createStore({
  // ...
});
vue-router4.x 的修改
提示
既然我们选择使用了 vue3.x, 那么我们也顺便看看 vue-router 中的最新版本有哪些变化吧
参考来源
- vue-router README
- 更多的变更提案参考:Vue RFC
导入方式
// 旧版
import Router from "vue-router";
export default new Router({
  mode: "hash",
  // ...
});
// 新版
import { createRouter, createWebHistory } from "vue-router";
export default new createRouter({
  history: createWebHistory(),
  // ...
});
router-link
router-link 添加 scoped-slot API 和 custom 属性, 并移除了 tag 属性和 event 属性。添加 scoped-slot 有什么用呢?以前只能通过 active-class 来改变元素样式的, 现在有了 scoped-slot 之后, 我们就更加灵活了, 可以根据 scoped-slot 回传的状态自定义, 不管是样式还是类。
<router-link to="/" custom v-slot="{ href, navigate, isActive }">
  <li :class="{ 'active': isActive }">
    <a :href="href" @click="navigate">
      <Icon>home</Icon><span class="xs-hidden">Home</span>
    </a>
  </li>
</router-link>
复制代码也就是说, 新版本的 Router 就更加的纯粹, 只提供给我们一些参数, 让我们自己利用这些参数来实现不同的场景。
meta 合并
给定一个嵌套路由
{
    path: '/parent',
    meta: {
        requiresAuth: true,
        isChild: false
    },
    children: [{
        path: 'child',
        meta: {
            isChild: true
        }
    }]
}
导航到 /parent/child 应该生成具有以下 meta 属性的路由:
路由匹配所有
// 旧版
const routes = [
  {
    path: "*",
    // ...
  },
];
// 新版
const routes = [
  {
    path: "/:catchAll(.*)",
    // ...
  },
];
新增方法
router.addRoute(route: RouteRecord)动态添加路由router.removeRoute(name: string | symbol)动态删除路由router.hasRoute(name: string | symbol): boolean判断路由是否存在router.getRoutes(): RouteRecord[]获取路由列表
一如既往的开启 vue3.x
我们使用官方推荐的 Vite 脚手架
提示
关于 Vite Vite 是一个 Web 开发构建工具, 由于其本机 ES 模块导入方法, 因此可以快速提供代码服务。
$ npm init vite-app <project-name>
$ cd <project-name>
$ npm install
$ npm run dev
一个简单的组件
提示
以下提供一个简单的组件供大家学习 vue3.x
bem.js
/**
 * bem helper
 * b() // 'button'
 * b('text') // 'button__text'
 * b({ disabled }) // 'button button--disabled'
 * b('text', { disabled }) // 'button__text button__text--disabled'
 * b(['disabled', 'primary']) // 'button button--disabled button--primary'
 */
export default function (ctx) {
  const ELEMENT = "__";
  const MODS = "--";

  const join = (name, el, symbol) => (el ? name + symbol + el : name);

  const prefix = (name, mods) => {
    if (typeof mods === "string") {
      return join(name, mods, MODS);
    }

    if (Array.isArray(mods)) {
      return mods.map((item) => prefix(name, item));
    }

    const ret = {};
    Object.keys(mods || {}).forEach((key) => {
      ret[name + MODS + key] = mods[key];
    });
    return ret;
  };

  const b = (el, mods) => {
    const { name } = ctx;

    if (el && typeof el !== "string") {
      mods = el;
      el = "";
    }
    el = join(name, el, ELEMENT);

    return mods ? [el, prefix(el, mods)] : el;
  };

  return {
    b,
  };
}
button.js
import { defineComponent, toRefs } from "vue";
import bem from "@/utils/bem";

const button = defineComponent({
  name: "button",

  props: {
    type: {
      type: String,
      default: "primary",
      validator(val) {
        return (
          ["success", "info", "warning", "danger", "primary"].indexOf(val) !==
          -1
        );
      },
    },
    disabled: {
      type: Boolean,
      default: false,
    },
  },

  setup(props, { slots, emit }) {
    const { b } = bem(button);
    // 注意这里的 props 是一个 Proxy 对象, 我们需要将其转换成普通对象才能对其进行使用
    const { type, disabled } = toRefs(props);
    const { value: $type } = type;
    const { value: $disabled } = disabled;

    // 我们使用 JSX 语法去写我们的组件
    return () => (
      <button class={b([$type])} disabled={$disabled}>
        {slots.default() ? <span> {slots.default()} </span> : null}{" "}
      </button>
    );
  },
});

export default button;